It Just won´t stick

Updated on March 4, 2019 in Getting Started
17 on March 26, 2018

hey there,

I tried to print Objects in varying sizes – meaning the area sticking on to the buildplatform varies from just supportstruckture up to two thirds of that area is covered by the actual build.

I tried to use clear zPMMA and performed the following tweaks.

I sanded the buildplate with P60 and later with P40.

Calibrated the z axis many times.

I made shure there is no misprint leftovers in the vat.

I read on this forum that the resin bottle should be shaken but not to much and just to be save I took it out and made shure it wasn´t shaken insuficiently.

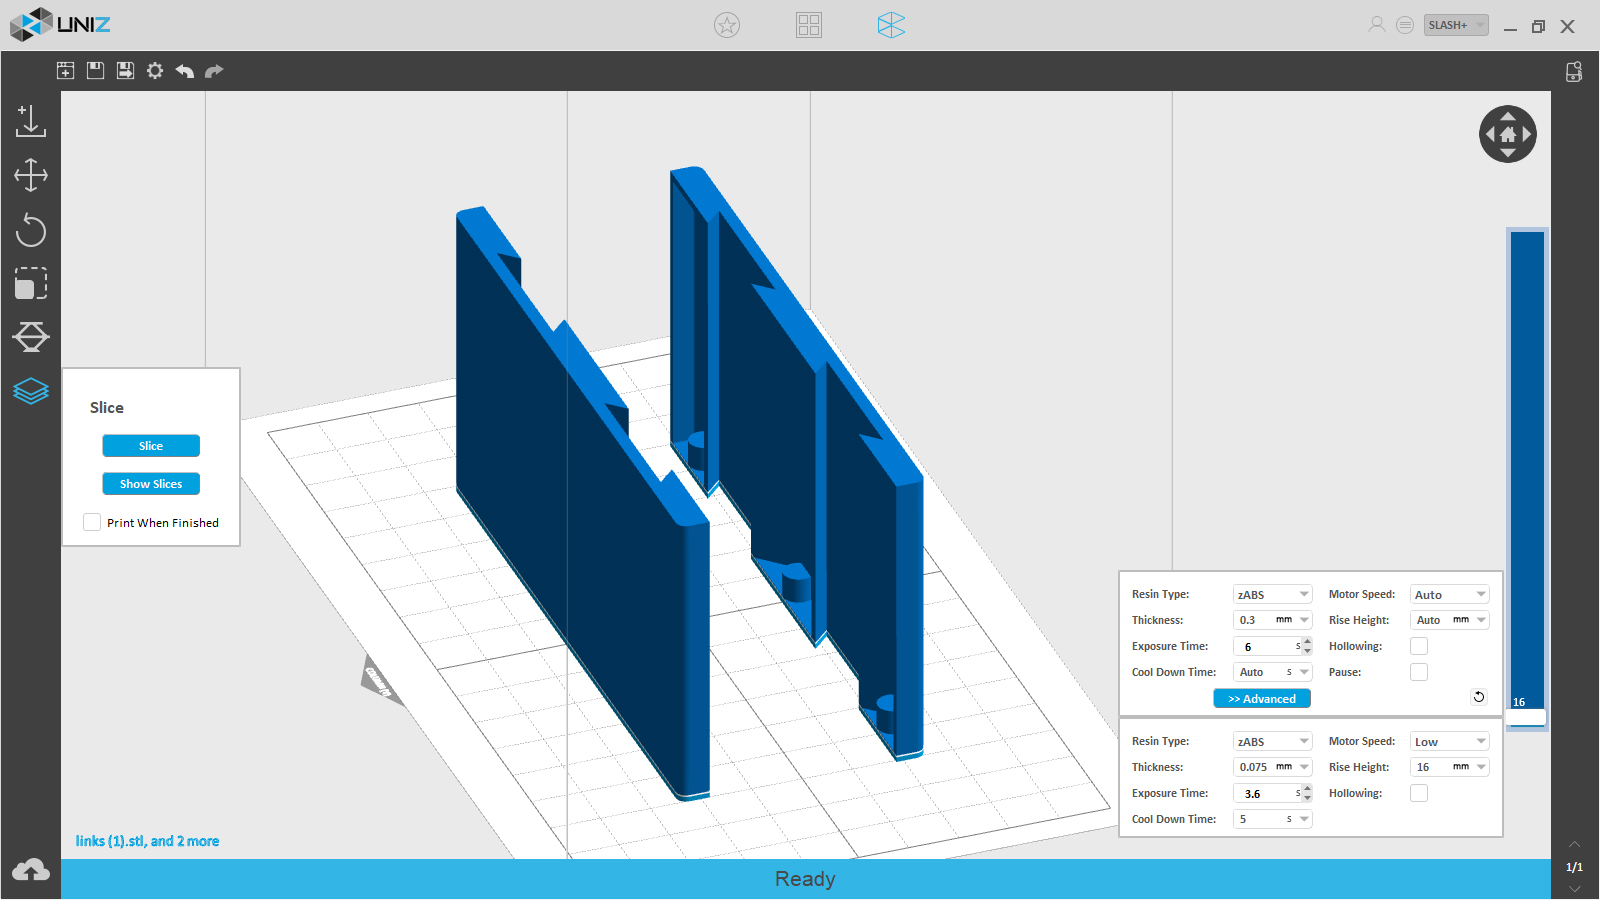
Most of the trick stuff can probably be done by adjusting the curing time. So I tried 0,05mm with 3 sec. to 10.sec for 15layers.

than 0,3mm with 6sec to 15 sec. curing with slow motor 16mm lift and pause…

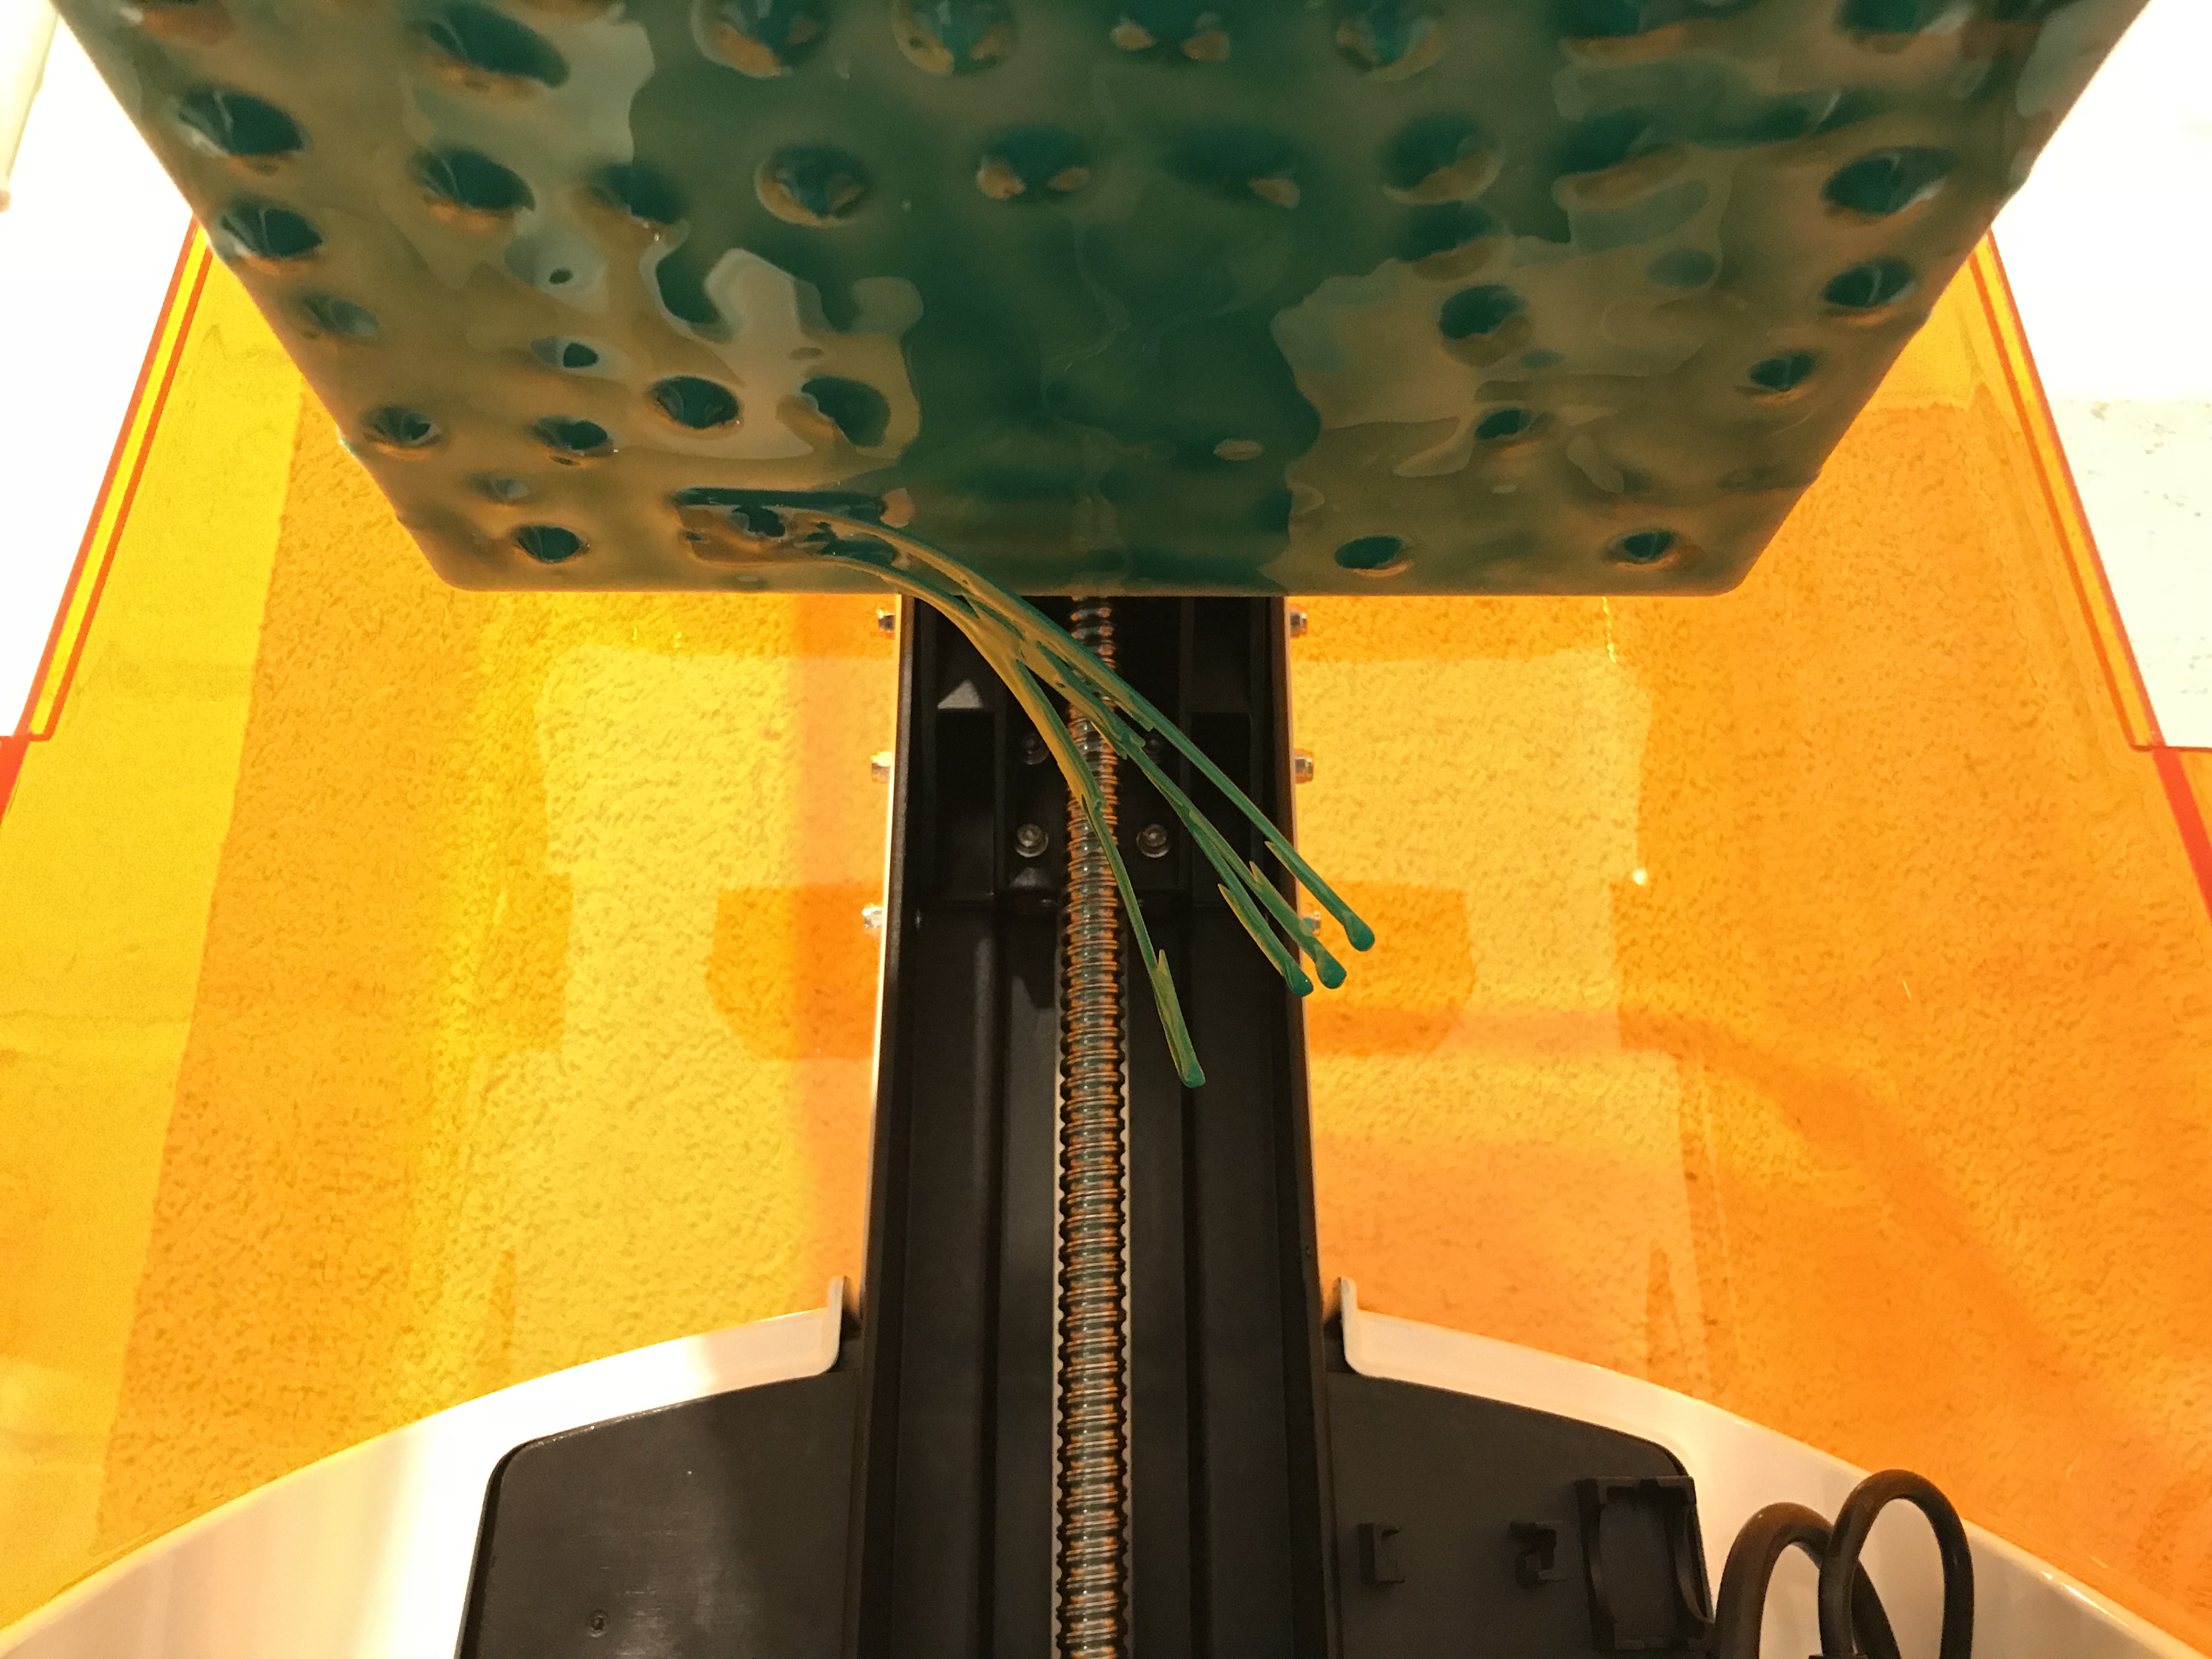
I did many test series for 8h and wasted 250ml of resin, and now I ran out of ideas what could be done to make the build stickt to the Platform.

I still have a bottle of green resin. It came to my mind that there could be something wrong with the clear zPMMA. But if the  solidifying component in the green and the clear stuff is the same there should be no differnence and I could even just continue with green resin without washing the entire resin system. Could I?

If anybody has some experience with the clear zPMMA or has overcome the severe -non stick- problem in general, please let me know.

Thanks in advance – Chris

 
  • Liked by
Reply
1 on March 27, 2018

Can you show me the settings and results?It’s best to post the picture.

on March 27, 2018

Unfortunately I haven´t filed an extensive documentation. So here some uncured examples I scraped of the vat. The large part has been rinsed, the others not. 

Show more replies
  • Liked by
Reply
Cancel
5 on March 27, 2018

To the clear resin,the cure time should be 8s for 0.1mm thickness,and the area of the cure section shown in your above pictur,is very big,you should slow the motor speed and increase the rise height to 8.but I can’t make sure that can be success.

on March 27, 2018

The suggested adjustments did not work. The clearPMMA seams to have no sticky ambitions at all.


I cleaned the maschine since you did not mention mixing the fluids is no problem and went with the green resin. -> but statement on mixing would be very nice anyway.

I was hoping the Eifeltower from your shop page would work flawless since I noticed that the slicing could not be edited. But nope…

In the pictures below my process in green, with no sucessfull propper bond to the buildplatform

the adjustments in the software (the #number matches the result in the picture above.)

And this is what some of the stuff looks like in the printer….

Do you have a formular how the green resin is most likely to get some result?


on March 27, 2018

The same problem with new Slash plus. (first printing)


on March 28, 2018

To the green resin, cure time 3s for 0.1 thickness, and the rise height don’t set to 16mm in this version, there will be a small problem which will be fixed in next version.

As for the sticking to the platform,the calibration for platform initial point is not in place, you should calibrate again. Or the build platform surface is not rough,use provided sandpaper to roughen the surface of the build platform and clean up.

on March 28, 2018

I sanded the platform with the provided p60 paper until it was used up. I than tried p40 – without any usable result, than back to p60 again. I scratch patterns. circles, zig zag, horizontal lines, criss cross. 

I cailbrated the z axis after each print.

If the VAT is full with resin or the first layers cover a large printing area, the z axis gear jumps / slipps – which makes calibrating obsolete – doesn´t it?

Problem discribed by Henrik as well.

[BUG] Please investigate and check all the problem we’re having with Slash after 3.14 firmware update like printing base sticking issues, z axis motor slipping (I have an open ticket for that) and the speed of the movement for first layers, eventually introducing a “super low” motor speed selectable for first layers…
From Henrik

I noticed the exposure starts right away after the platform has reached its designated hight. Due to flex in the “platform outrigger and z axis” the resin on user facing side is not squished out by the time the exposure starts. A delay for the LED panel might fix sticking problems as well.

Could somebody pleas post a picture of a sticky platform?

on March 29, 2018

Did you check the gap between platform and the LCD after pushing down the platform to the screen?

Show more replies
  • Liked by
Reply
Cancel
2 on March 29, 2018

Well… if the vat is almost empty and I push the platform down, I would say the platform touches the screen. Even though I would suspect more material to squish out on the side. mayby that is due to the roughnes of the plattform or the almost pasty characteristics of the resin. 

how would you suggest to proceed?

Do you have model and a timing recipe that is most likly to work regardles of – I don´t know – altitude, humidity, moon phase and considdering many of the parameters discussed not just in this thread but also on the forum have been edited?

on March 29, 2018

Christof , try to do Z-cal without the resin vat. Put a sheet of paper on the LCD! Normal A4 is less than 0,1 mm when vat Fep is 0,2 mm. Try then! Uniz could tell us how to do z-cal properly!

on March 30, 2018

Also set the the first three layers @0.01 microns with default settings to aid in adhesion to the platform.

Show more replies
  • Liked by
Reply
Cancel
0 on April 1, 2018

So, i noticed that my prints (with clear) started peeling better when the resin finally warmed up. That could be part of the issue. I also did the paper cal as Martti suggested.


  • Liked by
Reply
Cancel
0 on April 2, 2018

Christof
Are you sure that the build platform is flat sitting on the LCD?

  • Liked by
Reply
Cancel
0 on April 9, 2018

Thank you very much for all the replies.
Ok, here is whats been happening.
I had a 2 day break in trying to get the mashine to work – and just out curiosity I started the Eifeltower in green resin (in shop4free) again, because the timing is on a preset I can´t edit and I suppose it´s working for somebody.
I calibrated the z-axis again – as always prior to printing – and with no apparent reason, the mashine printed 4 Legs and started arches.
The printqualty was bad, and just as mysteriously as the print started after 45min the print went bad- stopped builing up more layers, even though the prozess continued.
My hypotheses:
The resin in the vat and on the platform, maybe even the hoses needed some time to oxydize and/or coat the printerparts.
Maybe in the manufacturing prozess silicon to prevent corosion are inside the hoses, pump etc. that actually change the resins curing and sticking ability.

Besides scratching buildplatform surfaces and propper z axis calibration – clean the vat, wash out potential manufactoring leftovers in the innertubes into the supplied empty bottle, get the maschine covered in resin-green (not zPMMA) wait for two days.

  • Liked by
Reply
Cancel
0 on April 9, 2018

Encouraged that atleast the Printer got some result, I tried all the proposals above in this thread.

I got the best sticking result, If I preheat the Buildplatform to about 37°C – 40°C and keep the roomtemperatur above 27°.

I have removed the display protection foil – It makes a difference.

green does come out allright first 3 layers 0,1mm at 15sec. -> restlayer 0,1mm at 3,9sec.

  • Liked by
Reply
Cancel
1 on March 1, 2019

Hi

I had the same problem. I replaced the cooling board and LED board. Re levelled the bed and re levelled the build platform . 

And still the same problem. Then stumbled on a mention of reset the Z axis. and found this useless video https://www.youtube.com/watch?v=G5lJ-1rnC4k

I tried it and of course failed. What they did not mention is you have to click Z axis button in the printer pop up in the software over by the resin fill and other buttons.

That worked for me. But it took 2 bottles of resin to find out and have to buy more.

I had to replace cooling board as the original one could not print 0.01mm without poor layer lines from poorly made designed cooling board.

So I think now for the prints I have done it is costing me US$100 per 20mm square 2mm thick hollow print. Costs are rising as more fails are found. Labour cost not included…that will total to $300.

I now found out I have to re calibrate the resin sensor as I was so happy with it sticking to the build platform that even with auto refill it used all the resin in the vat and only printed half the object. 

So if you want to make sure things will work for each print.

A. Level build platform

B. Reset Z axis

C. Calibrate resin fill

D.Release coolant pressure

https://www.uniz.com/us_en/support/support_slash_release_pressure/

Now thats before second guessing what settings you need….see with the software update there are even more parameters. Like trying to pick a combination lock there may well be 1 million combinations.

Good luck people!

I am selling up and buying a FormLabs!! 

on March 4, 2019

Hi Ian, Sorry for inconvenience caused. The video you found from youtube is an old version. We have updated new videos for basic use and maintenance on our website. Here’s the URL:

https://www.uniz.com/us_en/support/supportslash/


The big advantage of UNIZ printer comparing with Form 2 is the printing speed. it is 10-50x faster.

Show more replies
  • Liked by
Reply
Cancel
Loading more replies